
Turn Your Simple Photo Into a Professional Studio Portrait
Description
Learn how to convert your normal photo into a professional studio-style portrait using AI tools. This step-by-step guide will help you create clean, aesthetic, and high-quality images with perfect lighting and background—without going to a studio.
Introduction
In today’s digital world, your photo matters a lot. Whether you are using LinkedIn, Fiverr, Upwork, or even Instagram, a professional-looking image creates a strong first impression.
But the problem is simple:
Not everyone has access to a studio, expensive camera, or professional photographer.
The good news is 👍
Now you can turn your simple mobile photo into a professional studio portrait using AI tools and the right method.
In this detailed guide, you will learn:
- How to take the perfect photo
- How AI works for photo editing
- The exact prompt to use
- Tips to get the best professional results
Let’s start step by step 👇
Why a Professional Photo is Important
Before we start, let’s understand why this matters.
A professional photo helps you:
- Build trust online
- Look more serious and confident
- Attract more clients (freelancing platforms)
- Improve your personal brand
👉 Example:
If two people have the same skills but one has a clean professional photo, people will trust that person more.
Step 1: Take a Perfect Photo (Most Important Step)


This is the most important step.
If your original photo is bad, AI cannot fully fix it.
Best Practices:
- Stand near a window for natural light
- Use a clean and simple background
- Keep your face clearly visible
- Use a good camera (even mobile is fine)
- Keep the camera at eye level
Pro Tip:
Morning or evening light is best because it is soft and natural.
Trending Baby Dance AI Video: Step-by-Step Guide for Beginners
Mistakes to Avoid:
- Low light or dark photos
- Blurry images
- Messy background (room, people, objects)
- Overexposed (too bright) photos
👉 Remember:
Good input = Best output
Step 2: Understand How AI Photo Editing Works
AI tools can:
- Remove backgrounds
- Add new backgrounds
- Improve lighting
- Enhance image quality
But AI does NOT create magic from nothing.
It improves what you already have.
That’s why your original photo quality is very important.
Step 3: Use the Right Prompt (Very Important)
Now comes the most powerful part.
Use this exact prompt in any AI image tool:
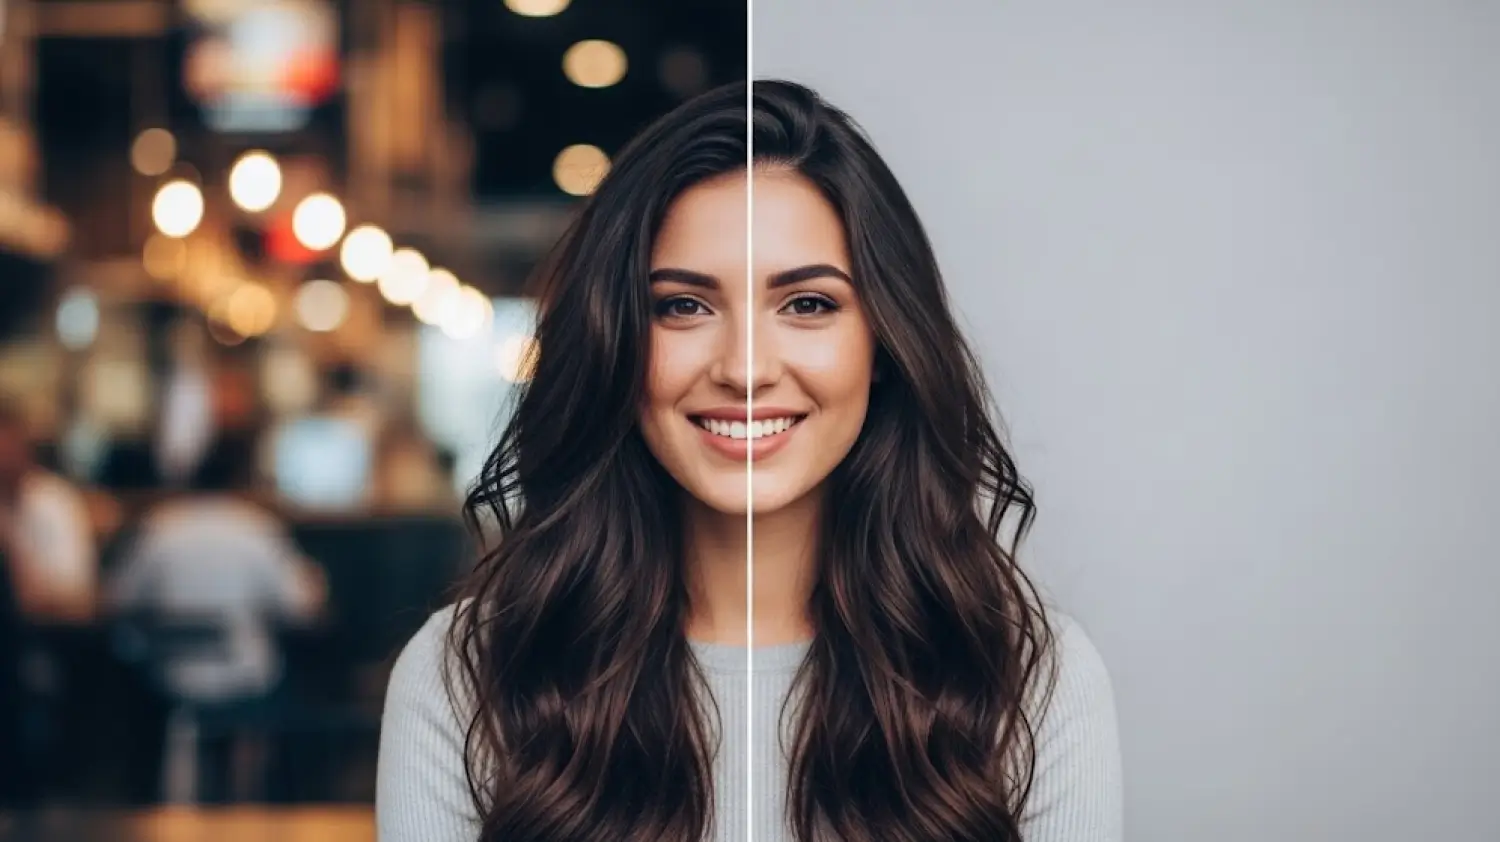
Remove the background of this image and replace it with a clean, professional studio background. Use a soft gradient background (light grey, white, or beige tones) with realistic studio lighting. Add subtle shadows and depth to make it look like a high-quality studio portrait.
IMPORTANT: Do NOT change the face, do NOT alter facial features, do NOT modify skin tone, and do NOT change the pose or body position. Keep the subject exactly the same. Only replace the background and enhance lighting slightly for a natural studio effect.
Why This Prompt Works:
- It clearly tells AI what to do
- It protects your original face and identity
- It focuses only on background and lighting
- It creates a realistic studio effect
👉 This is important because many AI tools change faces if instructions are not clear.
Step 4: Choose the Right AI Tool
You can use different AI tools for this purpose. Some popular options are:
- Canva (Background remover + editing)
- Remini (Enhance quality)
- Adobe Photoshop (Advanced editing)
👉 You can also use AI tools that support prompts for editing.
Happy New Year 2026: 10 Best Gemini AI Photo Prompts for Stunning Images
Step 5: Apply the Prompt and Edit Your Photo
Follow these steps:
- Upload your photo
- Paste the prompt
- Apply the changes
- Wait for processing
What You Will Get:
- Clean background (no distractions)
- Soft studio lighting
- Natural shadows
- Professional and polished look
Step 6: Extra Tips for Best Results
Clothing Tips:
- Wear simple colors (black, white, grey)
- Avoid heavy patterns
Expression:
- Keep a natural smile
- Look confident
Position:
- Face the camera directly
- Keep your posture straight
Step 7: Where You Can Use This Photo
Your professional image can be used for:
- LinkedIn profile
- Fiverr / Upwork gigs
- CV or resume
- Instagram profile
- Personal branding
👉 A good photo can increase your chances of getting hired.
Common Mistakes to Avoid
- Using low-quality images
- Over-editing (too artificial look)
- Changing facial features
- Using too many filters
👉 Always aim for a natural and realistic result
Safety and Authenticity
Always keep your real identity.
Do not change your face or skin tone.
A professional image should look:
- Real
- Clean
- Honest
This builds trust with your audience.
Conclusion
Turning your simple photo into a professional studio portrait is now very easy.
You just need:
- A clear photo
- A powerful prompt
- A good AI tool
Follow these steps and you can create a high-quality professional image without spending money on a studio.
👉 Final Tip:
Focus on natural look, clean background, and soft lighting — this is the secret of a perfect professional photo.